Learn to prepare routines, train with your watch and understand your progress. Step-by-step guides and answers for every stage.
No matches. Try another word or browse the index.
Routines and exercises
Step by step
Open Routines and tap Create. Use the assistant, create a routine manually or record indoor classes only. The assistant suggests routines for your equipment, level, goal and time; review and replace exercises before saving. Classes can be standalone, before or after strength training. Saved routines appear in My routines and can be followed on your phone or a compatible watch.
Tap Add exercise. Search the library by name and filter by muscle or equipment. Open the details to check the movement, then select the exercise you need. Repeat to complete the routine.
Set each row: weight and reps, or time and distance depending on the exercise. Add set creates another row; the delete icon removes that set. Check the units before saving: routine values are targets, not completed results.
Set the rest period and useful exercise notes, such as a machine setting. Use the superset option to alternate exercises. Check the grouped exercises and sets: a superset changes the sequence, not the identity of each exercise.
Tap Save and check the routine in the list. Edit it later or duplicate it for a variation. Free allows up to three saved routines; Premium removes this limit. Before training without your phone, check that the updated routine appears on your watch.
A routine is your plan; a workout is the session you perform and save.
123
Set up each exercise
Tap the time to adjust rest. Add exercise notes on its left.
Each row is a set. Tap weight or reps to change the target; Add set creates another row.
Tap + SuperSet to group this exercise with another in the routine. The arrows on the right change its position.
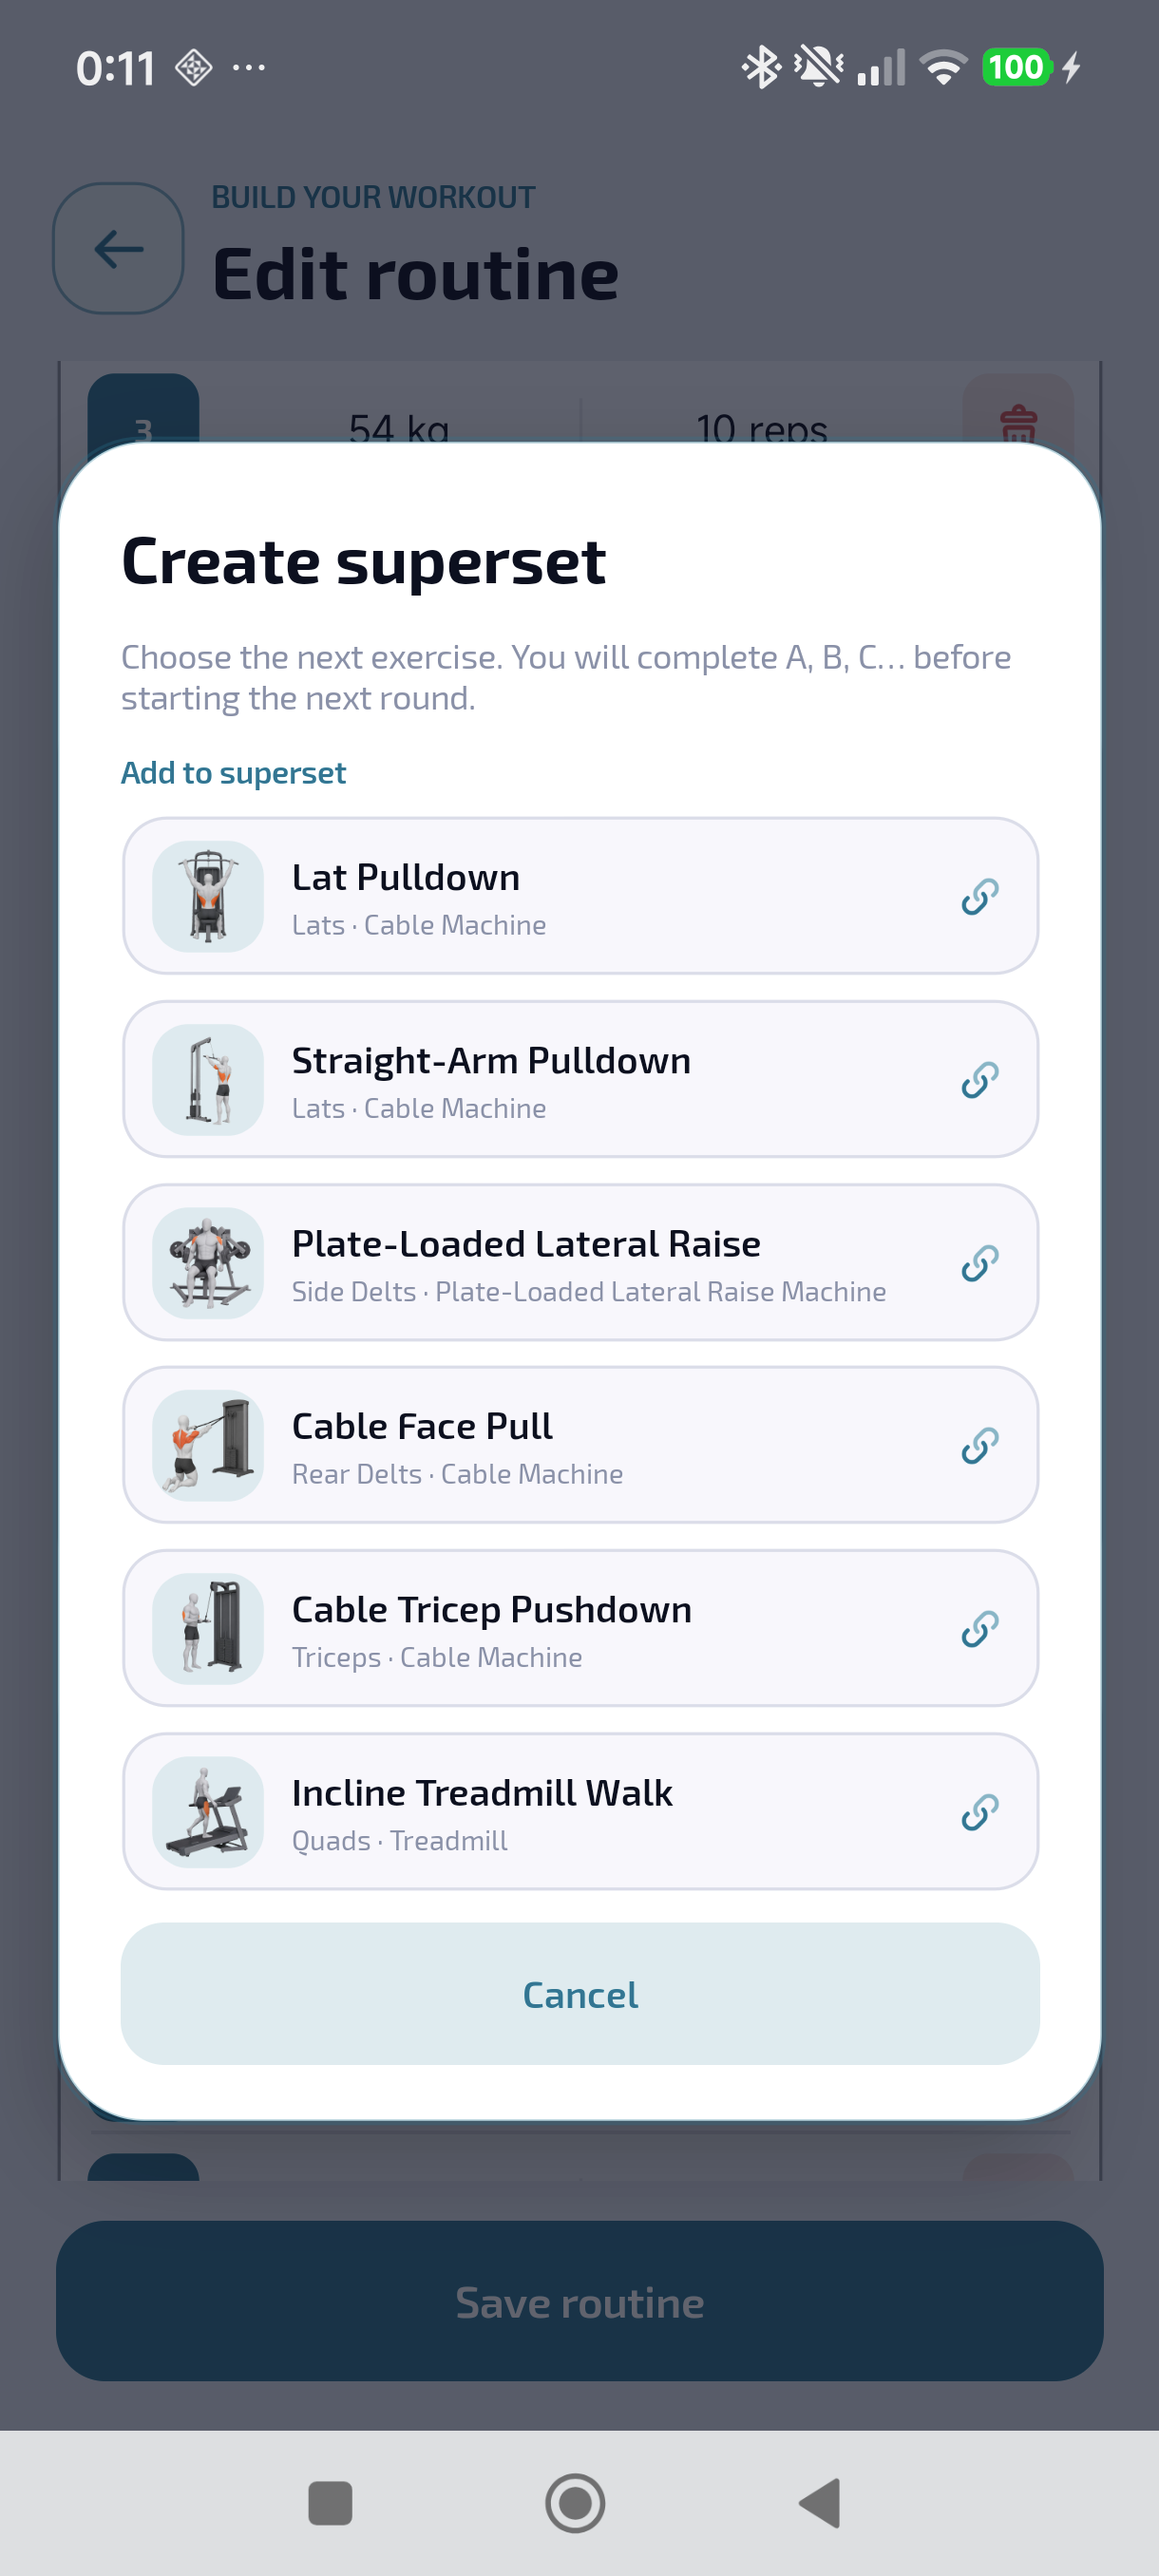
Choose the exercise to alternate
The selector lists the other exercises in the routine. Tap one to group it: perform one set of each exercise before returning to the first, for example A → B → A → B. Check the group in the editor and save the routine. Cancel closes the selector without adding a superset.
Assistant: one routine or a full week
In My routines, open “Find your next routine” and choose One routine or Full week. Set your goal, experience, equipment and available time. For a week, also choose how many days to prepare.
Each day contains gym exercises. The assistant does not add classes or rest days: you can add indoor classes later from Edit and arrange your own rest days.
Review the alternatives, exercises, sets and rest periods. In Full week, confirm each day before moving on; you can revisit a day you have already chosen. Saving creates normal routines to edit, share and train. Calendar dates are not added automatically.
Free allows up to three routines in total and a maximum of three days in the selector; Premium extends this limit. Weight is left unset: choose a load that lets you complete the suggested reps with good technique and some effort in reserve.
One routine prepares a particular session. Full week avoids restarting the assistant for every day: it uses shared preferences and offers alternatives for each session. Confirm days in sequence; you can change a choice before saving the set.
One to three days use full-body training; from four days, work is split across sessions. Each chosen day receives an exercise routine adapted to your experience. Classes and rest days are not added automatically; you can add indoor classes later when editing each routine. Rest and appropriate loads still matter. Minutes are an estimate, not a requirement to fill every available minute.
If your experience, equipment and time combination has insufficient alternatives, change the preferences. Suggestions use catalog exercises and do not replace individual assessment. Saved routines appear in My routines; schedule dates separately if you wish.
Indoor classes and combined routines
Create a routine containing only indoor classes, or add classes to strength training from Edit. Search by name or category; if needed, create your own named class. Set the planned minutes. BarbellPin records the class you attend; it does not provide instructor-led classes or videos.
For strength plus classes, or several classes, Train lets you choose what to start. One class or strength alone goes straight to the countdown. Finishing one part never starts another automatically. Before/After strength is a suggested order; it is hidden when there is no strength training.
Pause stops time. Minimize keeps the session running. Save for later preserves your progress so you can continue from that time; Finish marks it complete. Parts of the same routine execution share one history entry. Heart rate and calories appear only when measured by the watch.
For example, train strength in the morning and attend Zumba in the afternoon. Finish strength or save it for later and leave; the class waits until you choose to start it. Time between parts is not counted as active training. A class saved for later resumes from its accumulated time.
The selector also appears for two or more classes without strength. Starting a completed routine again creates a new execution and preserves previous history. If you add strength to a class-only routine, classes initially move after strength; change the order in Edit if needed.
Charts depend on watch samples received and can be enlarged from the detail. No readings are invented during a pause or when extending a duration. No GPS route is recorded.
Share and receive routines
In My routines, open a card’s vertical three-dot menu and choose Share routine. Find a community member, select them and confirm sending. You can share strength, classes or a combination; this does not publish a completed workout.
The recipient receives a notification. Opening it lets them review exercises and classes and add a copy to their routines, or cancel without adding it. Their plan’s routine limit still applies.
The copy is independent: later changes by the sender do not modify it. Workout history, records and private measurements are not shared. Sharing does not create a friendship or follow; blocks and permissions remain in effect.
The notification offers a routine, not a session performed by the sender. Before adding it, check required equipment, exercises, sets and classes. Receiving it does not add it automatically or publish anything on your profile.
Accepting creates your own copy to adapt to your level. Cancel returns without saving. If Free limits or authorization prevent acceptance, resolve the notice before retrying. Do not repeatedly send the same routine to fix a pending connection.
Sharing a private routine with someone does not add it to the assistant’s catalog. The sender’s progress photos, past results and health data remain private.
Exercise library and selection
Step by step
Search the exercise name and combine filters to narrow the list. If you cannot find it, clear the search or filters first. Equipment helps distinguish variations of the same movement.
Tap the card’s arrow to view muscles, instructions, tips and available animation. When browsing from a routine, tapping the card adds the exercise; the arrow lets you review it first.
If an exercise is missing, create it manually from the library. Tap the create exercise button, enter its name and choose the main muscle and tracking mode. You can add equipment and notes. Review the details and tap Create and add to use it in your routine.
Record a workout
Choose a routine in Train and confirm starting. A countdown appears before training begins. With strength plus classes, or several classes, choose one part first; the others wait.
Tap weight or reps to edit them with the selector or keyboard. Log what you actually perform and confirm each set afterwards. Weight can remain unset until you know it. Adjusting or skipping rest does not remove an exercise.
Pause stops time; Minimize keeps it running. Save for later preserves progress to resume; Finish marks it complete even with planned sets remaining. Live workout details show what was recorded. Discard removes that ongoing session: check the confirmation.
Log a workout manually
If you trained without live logging, open Train and tap the add-record icon in the header. You need an existing routine first. Select it to load a copy of its exercises, sets and classes; the original template stays unchanged.
Set the date, start time and strength duration in minutes. Each class has its own start details and duration. Keep only the exercises and sets you performed, reorder them with the editor gestures and enter the actual values. Review the summary and save once.
Exercise and set counts, volume and records are calculated from the confirmed entry. No heart rate or calories are invented. If upload is pending, keep the app data and reconnect to sync; do not create another identical entry.
Manual logging records a session you already performed; you do not need to start and finish an artificial timer. The routine supplies a starting copy. Removing or reordering exercises and sets here does not change your plan.
Check strength and each class’s start and duration separately. Do not enter future time as completed activity. If a record overlaps another, review the warning before confirming. The summary calculates exercise and set counts and volume from the data you keep.
A locally saved entry may appear in history before upload finishes. Wait for synchronization before actions requiring server confirmation; a connection error does not justify saving another copy. You can later correct values in the detail.
Train with your watch
Pair the watch with BarbellPin open on your phone and sync your routines. You can then train with the phone app closed. Use the matching environment on both devices.
Start the routine and choose strength or a class if it has several parts. The countdown comes before training. Tap values to edit; options include pause, save for later, finish and discard. At 0% volume, tones are muted while vibration remains on.
Automatic locking prevents accidental edits. If controls are locked, double-tap quickly to unlock; those taps do not change values. Sensors need permission: if readings are missing, check Enable sensors and watch permissions. A missing reading is not zero.
After finishing, open BarbellPin on the phone and keep both devices nearby until receipt is confirmed. Confirmation may follow the visible entry after a delay. Do not repeat the session, clear data or uninstall with pending transfers. Unlink closes the local execution and preserves pending records for the same account.
History and result corrections
Find a session by date in History. A routine is a template; history shows recorded work. A combined execution keeps strength and classes in one entry, even when continued later. Another execution of the same routine has its own separate entry.
Live workout details show recorded exercises and sets. Open a set to correct values. Use the main card’s selectors to adjust strength duration and performed exercise and set counts; check which data is being counted. Corrections recalculate volume and records, not calories.
Each class has its own editable duration in minutes and distance where supported. Its card follows the suggested position before or after strength. Heart rate, calories and charts require measured data: extending duration invents no samples; shortening limits the displayed interval.
Check date and units before saving. A pending upload is not a lost record: wait for synchronization instead of repeating it. Deleting a history entry differs from discarding an active session.
History, charts and photos
Step by step
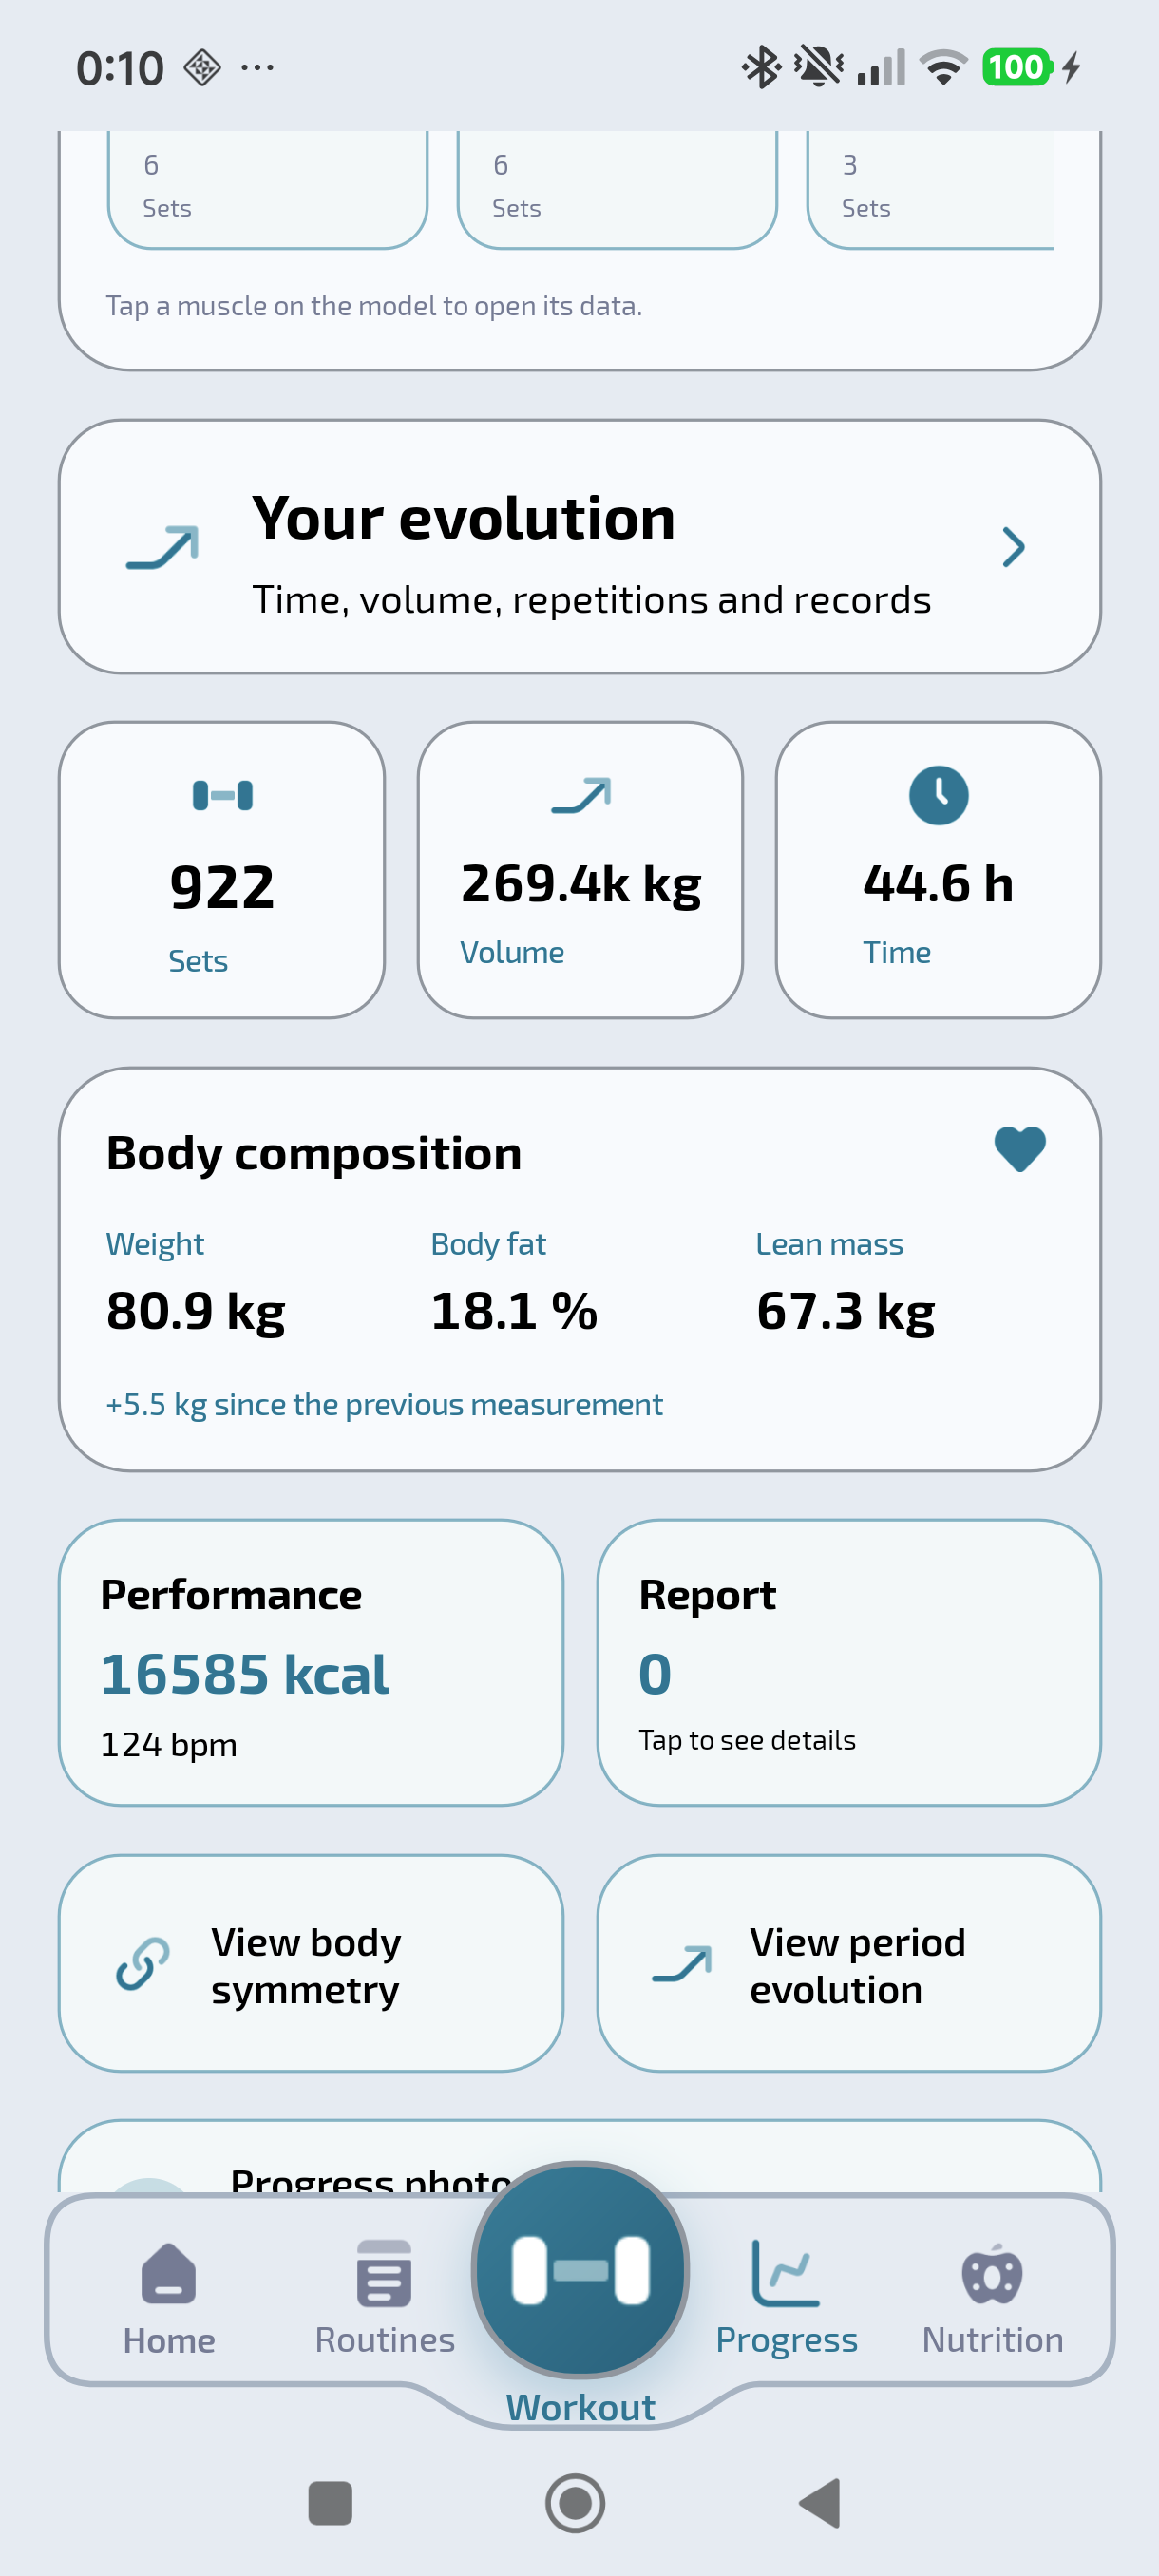
Open Progress: the muscle map shows a session, a week or four weeks. From here, open statistics, body analysis, comparisons and photos. Choose the period and metric before reading a chart.
In workout statistics, review workouts, time, sets and volume. Volume for weight-and-rep exercises combines those values; it does not mean calories. Tap selectable charts to inspect an exact value rather than only their shape.
Review muscle training distribution and compare equivalent periods. In Body analysis, review your measurements and trends. Photos provide another visual reference; use similar conditions and do not treat one photo as an exact measurement.
If data is missing, check that you finished the session and that it appears in History. Check the selected period and units. A watch workout awaiting reception is not necessarily lost: open the phone app to complete transfer before deleting or reinstalling anything.
Open saved sessions in History to review results. Charts represent recorded data; tap points or bars when selection is supported. Compare the same metric over equivalent periods.
In Progress, record measurements and photo sessions. Similar posture, distance and lighting help comparisons. Personal progress photos are not automatically published to Community.
Muscle distribution is estimated from recorded exercises and sets, not a measurement of each muscle’s effort. A class creates no strength sets or volume. Volume combines load and reps for compatible sets; it does not mean calories. Corrections in the detail update derived data.
123
Read your progress
Choose Week, 3 months, Year or All. The dates above the chart confirm the period shown.
Swipe the indicators to choose time, volume, reps or records. Switch between bars and lines.
Tap a bar or point to see its value. Compare the same metric over equivalent periods.
Measurements, trends and symmetry
In Progress, record the available measurements with the correct date and unit. Use the same measuring point and similar conditions when comparing changes. A missing measurement is not zero.
Review trends by period and tap chart data to inspect specific values. Compare equivalent periods and check each chart’s metric: body weight, measurements and training load are different quantities.
Symmetry requires measurements from both sides. It indicates which side measures larger; it is not a diagnosis. If a result is missing, check that both measurements exist and that the selected period contains enough data.
Photo sessions and comparison
Create a photo session in Progress and check its date. Add the available views from camera or gallery. Keep framing, posture, distance and lighting similar for useful comparisons.
To compare, choose two sessions and a view available in both. If a view is missing, add its photo or choose another. Progress photos and the comparison tool require Premium.
Progress photos are personal and are not automatically posted to Community. Always check the selected session before deleting an image.
Nutrition and daily logging
Select the day before adding food and check the meal it belongs to. Search for the food, use the available scanning options or create a manual entry if needed.
Always check quantity, unit and serving: values per hundred grams are not values for a whole item. Review recognized data before confirming. Summaries use the amounts you log; incomplete or duplicate entries change the totals.
Review nutritional trends by period to compare your logs. Food data and personal targets support tracking and do not replace professional assessment.
Profile and community
Tap a person's name or photo to view their profile, posts or follow them. Visibility depends on privacy and the relationship between accounts.
Following someone and being friends are different. You can follow a public profile without being friends with that person. Community on the Home screen only shows unread posts from people you follow, provided their privacy settings allow you to see them. Being friends does not mean you follow each other: you can view accessible content on their profile, but you also need to follow them for their posts to appear on Home. Following does not give you access to friends-only posts; an accepted friendship is required.
Edit your photo, alias and biography in Profile. Your alias must be available. New profiles are public; change this in Privacy and review discovery and request settings.
Browse posts from newest to oldest. Swipe the profile carousel to see photos and videos.
Photos and videos
A post supports up to 5 files. Switch between photo and video in Camera; Gallery detects the selected file type.
Videos up to 30 seconds, with original files up to 300 MB and prepared videos up to 50 MB. Long videos are trimmed and compressed; files above the input size limit must be reduced before selection. Review the clip before posting.
Wait for processing to finish before previewing. Review or remove attachments before publishing. Keep the app open and leave enough free storage during conversion.
Check phone permissions if Camera or Gallery will not open.
Preferences and permissions
Change language, theme, accent and units in Profile. Watch preferences update when syncing with the phone.
Configure sounds, vibration and rest notifications. Silent mode, Do Not Disturb and system permissions can limit alerts.
Health connections need authorization. Heart rate and calorie readings depend on available data; a missing reading does not mean zero.
Premium, purchases and codes
Check your plan and validity in Profile → Premium. Before buying, review the price, period and renewal shown by the relevant provider. Restore purchases recovers an existing store purchase; it creates no new payment or redemption allowance.
An invitation grants one month of Premium. Your first invitation does not require a previous purchase. After that, you need a new paid purchase and must respect the limit of one invitation per purchase duration in a rolling twelve-month period. Buying the same duration again does not reset this period. A new calendar year, device or store does not reset it either.
Your own reward has a separate allowance: at most one every twelve months. You may receive someone else's invitation and your own reward in that period. You cannot redeem your own invitations; your personal reward is account-bound. Retrying a code does not add time again. Invitations expire ten days after generation.
Management stays with the original provider. Android external payments use a card in the app: manage renewal, plan, payment method and billing details where applicable; a confirmed charge’s PDF receipt arrives by email. Google Pay, Link and PayPal are not offered for new purchases. iPhone uses the App Store. An extension is confirmed only when the provider accepts it; check the next billing date. Do not buy again to resolve a pending operation.
Canceling renewal avoids the next automatic charge and preserves the current period and applicable gifts. Refunds follow the provider’s terms. A gift or an existing period may prevent a duplicate purchase; do not remove rights to try paying again.
Gifts cannot be converted into money or transferred between accounts. For a rejected code, check its recipient, expiry, twelve-month limit and whether you made a valid purchase after your last redemption.
For an eligible annual purchase’s invitation campaign, read the conditions shown in the app. Each invitee must accumulate 60 valid minutes within the month after redemption, in one or several sessions; no minimum number of days is required. Opening an invitation link alone neither accepts it nor grants Premium.
Loading or synchronization problems
Check Internet access and retry. For the watch, also check Bluetooth, system pairing and proximity to the phone.
Sync missing or updated routines before starting. If a finished workout is missing, open BarbellPin on the phone, wait for receipt confirmation and check History before repeating any action.
Do not uninstall or clear data with pending workouts. If the issue persists, note the time and exact message and contact support.
Frequently asked questions
Why is my watch workout missing?
Open BarbellPin on the paired phone and keep both devices nearby. Check reception, then History and its filters. If still pending, keep the watch data and contact support with the routine and time.
Record dated measurements and choose comparable periods. For photos, open the comparison view and select the sessions. Photos and comparison require Premium; all body measurements are included in Free.
In Premium, tap Restore purchases with the store account used to buy. Wait for Google Play or App Store validation. If it fails, send support the platform and message, never passwords or bank details.
Video is trimmed to 30 seconds and compressed before posting. Wait for processing and preview the clip. The input limit is 300 MB per video; each post supports up to five photos or videos.
Edit your Community profile to change the photo, handle or bio. Review profile privacy and each post’s visibility. Progress photos are separate and are not automatically posted to Community.
Describe what you were trying to do, the steps to repeat it and the message shown. Attach a screenshot without sensitive data if useful. Never send passwords or access codes.